Shamrockin’ Sweets: Throw an Easy Irish Dessert Party!

Shamrockin’ Sweets: Throw an Easy Irish Dessert Party!

Shamrockin’ Sweets: Throw an Easy Irish Dessert Party!

Get ready to indulge in the Emerald Isle’s sweetest treasures! Throwing an Irish dessert party is a fun and delicious way to celebrate any occasion, from St. Patrick’s Day to a casual gathering with friends. Forget the complicated recipes and fussy decorations – this guide is all about creating a memorable spread with minimal effort. Get ready to impress your guests with these easy-to-make, authentically Irish (or Irish-inspired) treats!

Must-Have Irish Dessert Classics

No Irish dessert party is complete without a few traditional favorites. These are simple to make and guaranteed crowd-pleasers:

  • Irish Apple Cake: This moist and flavorful cake is a classic for a reason. Many recipes offer a delicious crumble topping for extra indulgence.
  • Guinness Chocolate Cake: The rich, dark stout adds a unique depth of flavor to this decadent chocolate cake. Top it with a Bailey’s Irish Cream frosting for an extra Irish kick.
  • Soda Bread: While not strictly a dessert, a slice of warm soda bread with butter and jam is a comforting Irish staple. Sweet variations with raisins or currants also exist.

Easy No-Bake Delights

Short on time? These no-bake options are perfect for a quick and impressive dessert spread:

  • Bailey’s Irish Cream Mousse: This light and airy mousse requires just a few ingredients and sets in the fridge, making it a perfect make-ahead dessert.
  • Irish Coffee Parfaits: Layer coffee-soaked ladyfingers with whipped cream and a drizzle of Irish whiskey for a simple yet elegant treat.

Fun & Festive Decorations

Set the scene for a shamrockin’ good time with simple yet effective decorations:

  • Green Everything!: Embrace the color green with tablecloths, napkins, balloons, and streamers.
  • Shamrock Accents: Scatter shamrock confetti on the table, use shamrock-shaped cookie cutters, or hang shamrock garlands.
  • Celtic Music: Create a lively atmosphere with traditional Irish music playing in the background.

Tips for a Smooth Celebration

Follow these tips to ensure your Irish dessert party is a success:

  • Prepare ahead: Choose desserts that can be made in advance to minimize stress on the day of the party.
  • Offer a variety: Include a mix of flavors and textures to cater to different preferences.
  • Don’t forget the drinks: Serve Irish coffee, Guinness, or Irish cider to complement the desserts.

Conclusion

Throwing an easy Irish dessert party is all about celebrating delicious treats and good company. With a little planning and these simple ideas, you’ll be hosting a memorable gathering filled with the sweet spirit of Ireland in no time! So gather your friends, put on some music, and get ready to indulge in some shamrockin’ sweets!

The Soda Bread Secret: Baking Perfect Irish Soda Muffins (Fun Facts Included!)

The Soda Bread Secret: Baking Perfect Irish Soda Muffins (Fun Facts Included!)

The Soda Bread Secret: Baking Perfect Irish Soda Muffins (Fun Facts Included!)

Forget yeast, forget kneading! Irish soda muffins are the quickest, easiest way to enjoy a taste of Ireland. These delightful little breads, with their signature crumbly texture and subtly tangy flavor, are a staple in Irish kitchens and a perfect treat for any occasion. But did you know there’s more to these muffins than meets the eye? Join us as we explore the fun facts and simple secrets to baking perfect Irish soda muffins every time.

A Quick Bread with a Rich History

Fun Fact #1: Soda bread, the ancestor of the soda muffin, originated out of necessity. Sodium bicarbonate (baking soda) was a readily available and inexpensive leavening agent in Ireland, especially in rural areas where yeast was harder to come by. This made soda bread a practical and accessible bread for many.

The transition from a large loaf to individual muffins made the bread even more convenient, perfect for individual servings and easier to bake evenly.

The Science of Soda: Why These Muffins Rise

Fun Fact #2: The magic of soda bread lies in the chemical reaction between baking soda and an acidic ingredient, typically buttermilk. This reaction produces carbon dioxide gas, which creates those characteristic air pockets and gives the muffins their light and airy texture. No waiting for yeast to do its thing!

Tips for Perfect Rising:

  • Use fresh baking soda. Over time, baking soda loses its potency, so check the expiration date.
  • Don’t overmix! Overmixing develops the gluten in the flour, leading to tough muffins. Mix just until the ingredients are combined.
  • Bake immediately after mixing to maximize the carbon dioxide release.

The Art of the Crumb: Achieving that Perfect Texture

Fun Fact #3: Traditionally, Irish soda bread was baked in a cast iron pot over an open fire. This method created a wonderfully crusty exterior. While we might use ovens today, the goal remains the same: a tender crumb and a slightly crisp crust.

Tips for a Perfect Crumb:

  • Use a combination of all-purpose flour and whole wheat flour for a heartier texture and nuttier flavor.
  • Handle the dough gently. Avoid kneading, as this will result in a dense, chewy muffin.
  • Cut a cross into the top of each muffin before baking. This allows the heat to penetrate the center and helps the muffins rise evenly.

Beyond the Basic: Flavor Adventures

Fun Fact #4: While traditional Irish soda bread is often plain, there’s no limit to the flavor combinations you can explore! From sweet to savory, the possibilities are endless.

Flavor Inspiration:

  • Sweet: Add raisins, dried cranberries, or currants for a touch of sweetness. A sprinkle of sugar on top adds a delightful crunch.
  • Savory: Incorporate herbs like rosemary or thyme, or add shredded cheese and chopped chives for a savory treat.

Conclusion: Baking Your Own Bit of Irish History

Baking Irish soda muffins is more than just following a recipe; it’s connecting with a rich culinary tradition. With these tips and fun facts in hand, you’re ready to create your own perfect batch of these delightful treats. So, gather your ingredients, preheat your oven, and enjoy the simple pleasure of baking a little bit of Irish history.

Shamrockin’ Good Fun: Unearthing the Secrets of Shamrock Cheese Crackers

Shamrockin’ Good Fun: Unearthing the Secrets of Shamrock Cheese Crackers

Shamrockin’ Good Fun: Unearthing the Secrets of Shamrock Cheese Crackers

Get ready to dive headfirst into a world of cheesy, crunchy goodness with a festive twist! Shamrock cheese crackers aren’t just a St. Patrick’s Day treat; their unique shape and savory flavor make them a fun snack any time of year. But where did these delightful crackers come from? Join us as we explore the quirky history and fun facts surrounding these bite-sized wonders, and of course, learn how to make your own!

A Surprisingly Un-Irish History

While the shamrock shape screams Ireland, the origin of these crackers isn’t quite so clear-cut. Surprisingly, there’s no definitive historical link to Ireland. The shamrock shape likely emerged as a novelty, capitalizing on the popularity of St. Patrick’s Day celebrations. This makes them a fun example of how food can adopt cultural symbols, even without deep historical roots.

The Science of the Snap: Achieving Cracker Perfection

The Importance of Gluten Development

The satisfying snap of a good cheese cracker comes down to gluten development. Properly kneading the dough allows gluten strands to form, creating a structure that results in a crisp texture. Don’t overwork the dough, though, or your crackers will be tough.

Chill Out: The Role of Refrigeration

Chilling the dough is crucial. It allows the gluten to relax and the fats to solidify, preventing the crackers from spreading too much during baking and contributing to a desirable flaky texture.

DIY Deliciousness: Making Your Own Shamrock Crackers

Forget store-bought! Making your own shamrock crackers is easier than you think. Here’s a simplified approach:

  • Combine softened butter, grated sharp cheddar cheese, flour, and a pinch of salt.
  • Mix until a dough forms, then chill for at least 30 minutes.
  • Roll out the dough thinly and use a shamrock-shaped cookie cutter (or get creative with a knife!).
  • Bake at 350°F (175°C) for 10-12 minutes, or until golden brown.

Pro Tip: For extra flavor, try adding spices like paprika, garlic powder, or even a dash of cayenne pepper to the dough.

Beyond the Basics: Flavor Adventures

Once you’ve mastered the basic recipe, the flavor possibilities are endless! Experiment with different cheeses like Gruyère, Parmesan, or even blue cheese. Add herbs like rosemary or thyme for an earthy touch. You can even create sweet and savory combinations by incorporating ingredients like chopped pecans and a sprinkle of brown sugar.

Conclusion: A Cracker Worth Celebrating

Shamrock cheese crackers, with their fun shape and delightful crunch, are a testament to the power of simple pleasures. Whether you’re embracing the St. Patrick’s Day spirit or simply craving a tasty snack, these crackers are a guaranteed crowd-pleaser. So, gather your ingredients, unleash your inner baker, and get ready to experience the shamrockin’ good fun of homemade cheese crackers!

Guinness Chocolate Cake: A Surprisingly Delicious Pairing You Won’t Believe!

Guinness Chocolate Cake: A Surprisingly Delicious Pairing You Won’t Believe!

Guinness Chocolate Cake: A Surprisingly Delicious Pairing You Won’t Believe!

Ever thought of adding beer to your chocolate cake? It might sound strange, but trust us, the magic of Guinness stout transforms an ordinary chocolate cake into a rich, decadent masterpiece. The slight bitterness of the Guinness enhances the chocolate flavor, creating a complex and unforgettable taste. Get ready to discover the fun facts and delicious secrets behind this surprisingly perfect pairing!

Why Guinness in Cake? The Surprising Chemistry

Guinness isn’t just a beverage; it’s a baking secret weapon! Its creamy texture adds moisture, while the roasted barley notes provide depth and complexity. The carbonation also helps create a light and airy crumb. You won’t taste a strong beer flavor; instead, it subtly enhances the chocolate, creating a symphony of flavors.

Fun Fact #1: It’s Not as Weird as You Think!

Using beer in baking has a long history. Stout, porter, and even lighter beers were commonly used in cakes and other baked goods for their leavening and flavor-enhancing properties long before modern baking powder and soda became readily available.

The Perfect Guinness Chocolate Cake Recipe: Tips and Tricks

While many recipes exist, here are some key tips for baking a Guinness chocolate cake that will wow your taste buds:

  • Use good quality cocoa powder: Dutch-processed cocoa powder will give you a richer, darker chocolate flavor.
  • Don’t overmix the batter: Overmixing can lead to a tough cake. Mix until just combined.
  • Room temperature ingredients: Ensure your eggs and butter are at room temperature for optimal mixing and a smooth batter.
  • Bake at the correct temperature: Follow the recipe instructions carefully and use an oven thermometer to ensure accuracy.

Fun Fact #2: Guinness and Chocolate: A Match Made in Dessert Heaven

The roasted barley notes in Guinness complement the bitterness of dark chocolate exceptionally well. This is why Guinness chocolate cake is often paired with a chocolate ganache or frosting for an even more intense chocolate experience.

Frosting and Pairing Ideas: Taking it to the Next Level

A Guinness chocolate cake is delicious on its own, but the right frosting can elevate it to new heights. Consider these options:

  • Cream Cheese Frosting: The tanginess of cream cheese cuts through the richness of the cake.
  • Chocolate Ganache: A decadent and intensely chocolatey option.
  • Bailey’s Irish Cream Frosting: A boozy and flavorful complement to the Guinness.

Fun Fact #3: A St. Patrick’s Day Favorite!

While delicious any time of year, Guinness chocolate cake is a particularly popular treat for St. Patrick’s Day celebrations.

Conclusion: A Must-Try Baking Adventure

Guinness chocolate cake is more than just a dessert; it’s an experience. The combination of rich chocolate and subtle Guinness notes creates a flavor profile that is both familiar and exciting. So, gather your ingredients, preheat your oven, and embark on this delicious baking adventure. You won’t be disappointed!

Green with Envy: Unveiling the Secrets of Vibrant Green Hummus

Green with Envy: Unveiling the Secrets of Vibrant Green Hummus

Green with Envy: Unveiling the Secrets of Vibrant Green Hummus

Move over, classic beige! There’s a new hummus hue in town, and it’s bursting with flavor and nutrients. Green hummus isn’t just visually stunning; it’s a delicious and versatile dip that’s surprisingly easy to make. Get ready to discover the secrets behind this vibrant appetizer and impress your friends with your culinary creativity.

The Magic of Green: Exploring the Ingredients

The secret to green hummus lies in the addition of leafy greens. But not just any greens will do! While spinach is a popular choice, you can experiment with other vibrant options like kale, parsley, or even cilantro. These greens not only lend their beautiful color but also pack a punch of vitamins and minerals.

Choosing Your Greens

  • Spinach: Offers a mild flavor and blends seamlessly into the hummus.
  • Kale: Provides a slightly earthier taste and a more robust texture.
  • Parsley: Adds a fresh, herbaceous note.
  • Cilantro: Imparts a bright, citrusy flavor (perfect for those who love it!).

Whipping Up Green Goodness: The Recipe

Making green hummus is a breeze! Here’s a basic recipe to get you started:

Ingredients:

  • 1 can (15 ounces) chickpeas, rinsed and drained
  • 1 cup packed fresh spinach (or other greens)
  • 1/4 cup tahini
  • 2 cloves garlic
  • 1/4 cup lemon juice
  • 2 tablespoons olive oil
  • Salt and pepper to taste
  • Water, as needed for consistency

Instructions:

  1. Combine all ingredients in a food processor and blend until smooth.
  2. Add water, 1 tablespoon at a time, until desired consistency is reached.
  3. Taste and adjust seasonings as needed.
  4. Serve with pita bread, vegetables, or crackers.

Beyond the Basics: Creative Twists and Serving Suggestions

Once you’ve mastered the basic recipe, feel free to get creative! Here are a few ideas to elevate your green hummus:

  • Spicy Kick: Add a pinch of cayenne pepper or a diced jalapeño for a fiery twist.
  • Herby Infusion: Incorporate fresh herbs like dill, mint, or basil for added flavor.
  • Roasted Red Pepper Power: Blend in roasted red peppers for a smoky, sweet element.

Serving Suggestions:

Green hummus is incredibly versatile. Try it with:

  • Pita bread, pita chips, or tortilla chips
  • Fresh vegetables like carrots, celery, and cucumber
  • Crackers or crostini
  • As a sandwich spread

Conclusion: Embrace the Green!

Green hummus is a fun, flavorful, and healthy way to add a pop of color to your snacking routine. With its vibrant hue and endless possibilities for customization, it’s sure to become a new favorite. So, grab your greens and get blending – you’ll be green with envy over how delicious this dip is!

Going Green with Glamour: Fun Facts About Green Macarons for Your Next Party

Going Green with Glamour: Fun Facts About Green Macarons for Your Next Party

Going Green with Glamour: Fun Facts About Green Macarons for Your Next Party

Move over, traditional pastels! Green macarons are having a moment, bringing a touch of whimsical elegance and unexpected freshness to celebrations. From vibrant emerald to soft pistachio, these delicate treats aren’t just delicious; they’re a conversation starter. But beyond their captivating color, there’s a world of fascinating facts surrounding these little green gems. Ready to dive in?

The Meaning Behind the Green

Green, the color of nature and renewal, adds symbolic depth to your macarons. Depending on the shade, they can evoke feelings of luck (think St. Patrick’s Day), tranquility (like a serene forest), or even sophistication (with a deep jewel-toned hue). This makes green macarons perfect for a variety of party themes, from whimsical garden parties to elegant cocktail soirees.

Green Dye Decoded

Achieving that perfect shade of green can be an adventure in itself! Traditionally, natural dyes like spinach, matcha, and spirulina were used. Today, while food coloring offers convenience, many bakers are returning to natural options for a richer flavor and a sense of authenticity. These natural dyes can create subtle variations in the green, adding to their unique charm.

Flavor Pairings that Pop

Beyond the visual appeal, the flavor possibilities with green macarons are endless! The green hue sets the stage for exciting pairings. Think pistachio with white chocolate ganache, matcha with a hint of citrus, or even a daring mint chocolate chip combination. The color itself primes our taste buds for fresh, vibrant flavors.

Creative Filling Combinations

  • Pistachio & Rosewater: A delicate and fragrant combination that evokes a sense of elegance.
  • Key Lime & Coconut: A tropical twist that brings a burst of sunshine to your palate.
  • Matcha & White Chocolate: A classic pairing that balances the earthy matcha with the sweetness of white chocolate.

Green Macarons in Party Planning

Green macarons can be incorporated into your party décor in creative ways. Consider using them as:

  • Cake toppers: Arrange them artfully on top of a cake for a pop of color and texture.
  • Table centerpieces: Display them on tiered stands or in decorative bowls for a visually stunning centerpiece.
  • Party favors: Package them individually in small boxes or bags for guests to take home.

Tips for Serving

For optimal enjoyment, serve your green macarons at room temperature to allow their delicate flavors to fully bloom. Arrange them on a beautiful platter and provide small tongs for easy serving. Don’t forget to offer a variety of beverages that complement their flavors, such as tea, coffee, or sparkling wine.

Conclusion

Green macarons offer a delightful blend of beauty, flavor, and fun facts. By understanding their symbolism, exploring creative flavor combinations, and incorporating them thoughtfully into your party décor, you can elevate any celebration with these charming treats. So, go green and get ready to impress your guests!

Spice Up Your Life (and Your Corned Beef!): A Deep Dive into DIY Seasoning


Spice Up Your Life (and Your Corned Beef!): A Deep Dive into DIY Seasoning

Spice Up Your Life (and Your Corned Beef!): A Deep Dive into DIY Seasoning

Let’s face it, store-bought pickling spice can be a bit of a gamble. Sometimes it’s perfect, other times it tastes like dusty disappointment. Why leave your corned beef’s destiny to chance? Making your own corned beef seasoning is surprisingly easy, incredibly rewarding, and unlocks a world of flavor customization. Get ready to ditch the pre-packaged stuff and embark on a culinary adventure!

The Magic of Homemade Corned Beef Seasoning

What makes homemade so much better? Control! You choose the spices, their quality, and the proportions to create your ultimate corned beef experience. Plus, the aroma that fills your kitchen while toasting the spices? Pure heaven.

The Core Four: Essential Spices

These are the backbone of any good corned beef seasoning:

  • Mustard Seeds: Provide a pungent, earthy base.
  • Coriander Seeds: Offer a citrusy, warm complexity.
  • Black Peppercorns: Add a familiar bite and depth.
  • Bay Leaves: Bring a subtle herbal sweetness.

Spice Rack Exploration: Adding Flair

Once you’ve mastered the core four, it’s time to get creative! Here are some exciting additions:

  • Allspice: For a warm, peppery sweetness.
  • Ginger: Adds a zesty, aromatic kick.
  • Cloves: Offer a warm, intense sweetness.
  • Juniper Berries: Bring a piney, resinous note.
  • Red Pepper Flakes: For a touch of heat.

Pro Tip: Toast whole spices in a dry skillet over medium heat until fragrant for a deeper, more robust flavor. Be careful not to burn them!

A Classic Corned Beef Seasoning Recipe

Ready to get started? Here’s a simple yet delicious recipe:

  • 2 tablespoons mustard seeds
  • 1 tablespoon coriander seeds
  • 1 tablespoon black peppercorns
  • 2 bay leaves
  • 1 teaspoon allspice berries
  • 1/2 teaspoon ginger powder

Instructions: Toast the mustard seeds, coriander seeds, peppercorns, and allspice berries until fragrant. Grind coarsely. Combine with the bay leaves and ginger. This recipe is enough for about 2 pounds of corned beef.

Beyond Corned Beef: Versatile Seasoning

Don’t limit yourself! This versatile seasoning blend is fantastic in other dishes too:

  • Pickling vegetables
  • Adding depth to soups and stews
  • Rubbing on pork or poultry before roasting

Conclusion: The Spice of Life is in Your Hands

Making your own corned beef seasoning is a game-changer. You’ll enjoy a more flavorful, personalized experience, and you’ll never look at pre-packaged spices the same way again. So gather your spices, unleash your inner chef, and get ready to enjoy the most delicious corned beef of your life!


Knead to Know: Fun Facts About Irish Soda Bread


Knead to Know: Fun Facts About Irish Soda Bread

Knead to Know: Fun Facts About Irish Soda Bread

Forget the yeast, forget the kneading – Irish soda bread is the ultimate quick bread, steeped in history and surprisingly simple to make. But beyond its easy-bake nature lies a wealth of fascinating facts and traditions. So, pull up a chair, grab a cuppa, and let’s delve into the wonderful world of Irish soda bread!

A Loaf Born of Necessity

Bicarbonate of soda, the key ingredient that gives this bread its lift, became widely available in Ireland in the 1830s. Before then, yeast was expensive and often unreliable. Soda bread provided a cheap and cheerful alternative, utilizing readily available ingredients like soft wheat flour, buttermilk (the acid that reacts with the soda), and salt. Its simplicity made it a staple in even the poorest of Irish households.

Regional Variations: A Slice of Local Flavor

While the basic recipe remains consistent, regional variations add a unique twist. In some areas, sugar, raisins, caraway seeds, or even eggs might be added.

  • Ulster Soda Bread: Often sweeter and may include raisins or currants.
  • Southern Irish Soda Bread: Typically made without sugar, resulting in a more savory loaf.
  • Brown Soda Bread: Uses whole wheat flour for a nuttier flavor and denser texture.

These subtle differences reflect the local tastes and available ingredients, making each loaf a unique representation of its region.

Beyond St. Patrick’s Day: A Year-Round Treat

While often associated with St. Patrick’s Day feasts, soda bread is a beloved staple enjoyed throughout the year in Ireland. It’s a frequent accompaniment to soups, stews, and even breakfast. Its versatility and simple elegance make it a welcome addition to any meal.

Baking Your Own: Tips for Soda Bread Success

Ready to try your hand at baking soda bread? Here are a few tips for a perfect loaf:

  • Don’t overmix: Gentle mixing is key to a light and airy texture. Overmixing develops the gluten and will result in a tough loaf.
  • Shape into a round: The traditional shape is a round loaf with a deep cross cut on top. This allows the heat to penetrate the center and helps to prevent cracking.
  • Bake immediately: Once the dough is mixed, get it into the oven as quickly as possible to maximize the reaction between the buttermilk and baking soda.
  • Cool on a wire rack: This prevents the bottom of the loaf from becoming soggy.

A Taste of Tradition

Irish soda bread is more than just a quick bread; it’s a taste of history, a symbol of resourcefulness, and a delicious reminder of Irish culinary heritage. So, whether you’re celebrating St. Patrick’s Day or simply craving a comforting loaf, embrace the simplicity and savor the story behind this iconic bread.


Garlic Parmesan Roasted Brussels Sprouts

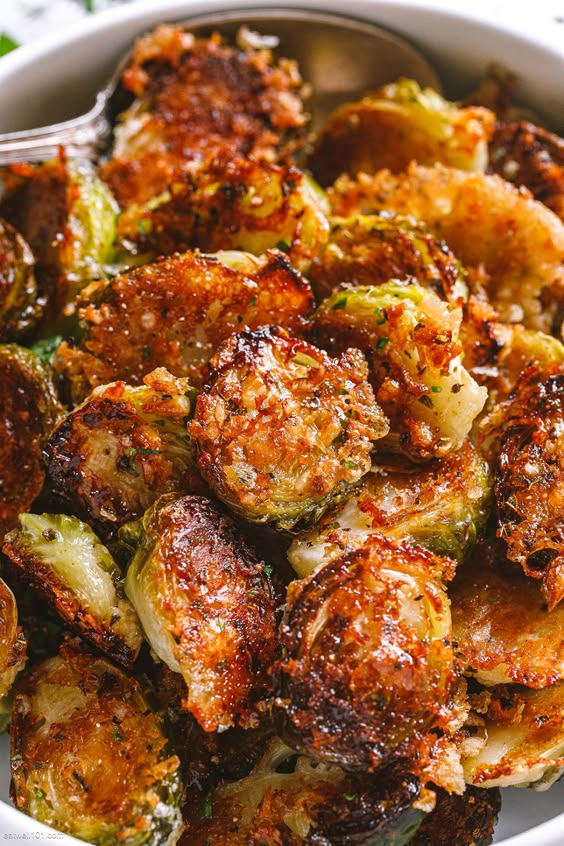
This yummy roasted Brussels recipe makes a flavourful and delicious side dish. The easy roasted Brussels sprouts side, perfect for upcoming Holidays table!

Ingredients list for the Parmesan Brussels sprouts

  • 16 oz (450g) Brussels sprouts, rinsed
  • 3 tablespoons olive oil (or melted butter)
  • 1/2 teaspoon kosher salt and freshly cracked black pepper
  • 1 teaspoon Italian seasoning
  • garlic cloves, minced
  • 1/2 cup grated Parmesan cheese, or to taste

Directions:

How to make Roasted Brussels Sprouts:

1. Prep: Preheat oven to 400ºF (200ºC) with the rack in the middle.

2. Trim the bottom of the Brussels sprouts, and slice each Brussels sprout in half, top to bottom.

3. Grease a rimmed baking sheet a large baking sheet (you can line it with parchment paper if you like).

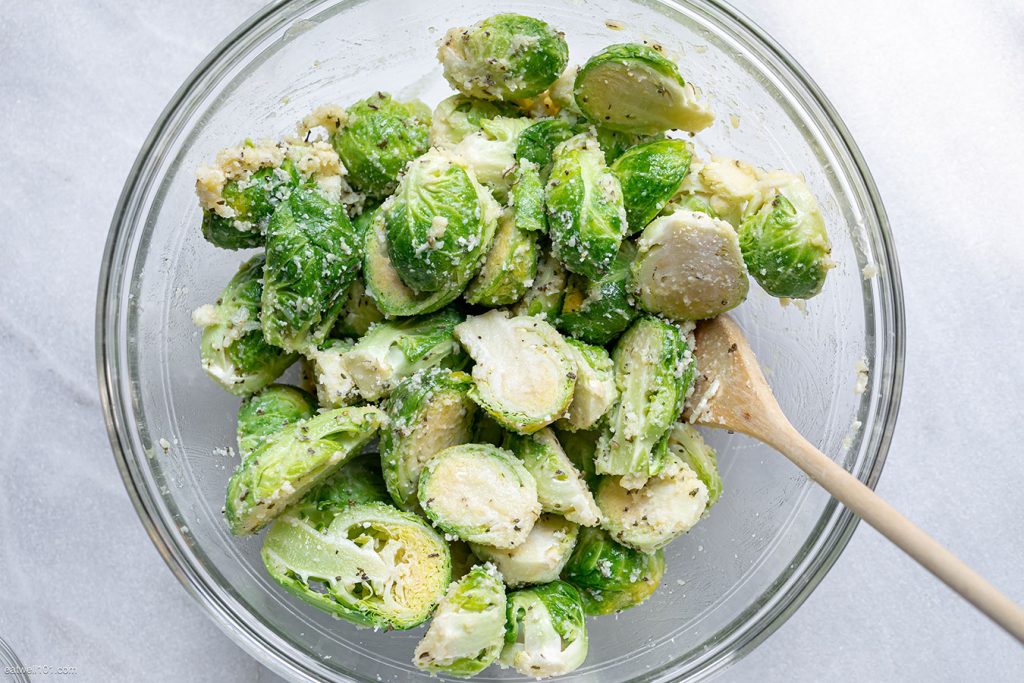
4. Pat the Brussels sprouts dry with paper towels and place them in a large bowl. Add olive oil, Italian seasoning, garlic, Parmesan, salt, and pepper.

5. Add olive oil, Italian seasoning, garlic, Parmesan, salt, and pepper. Toss gently to coat the Brussels sprouts evenly.

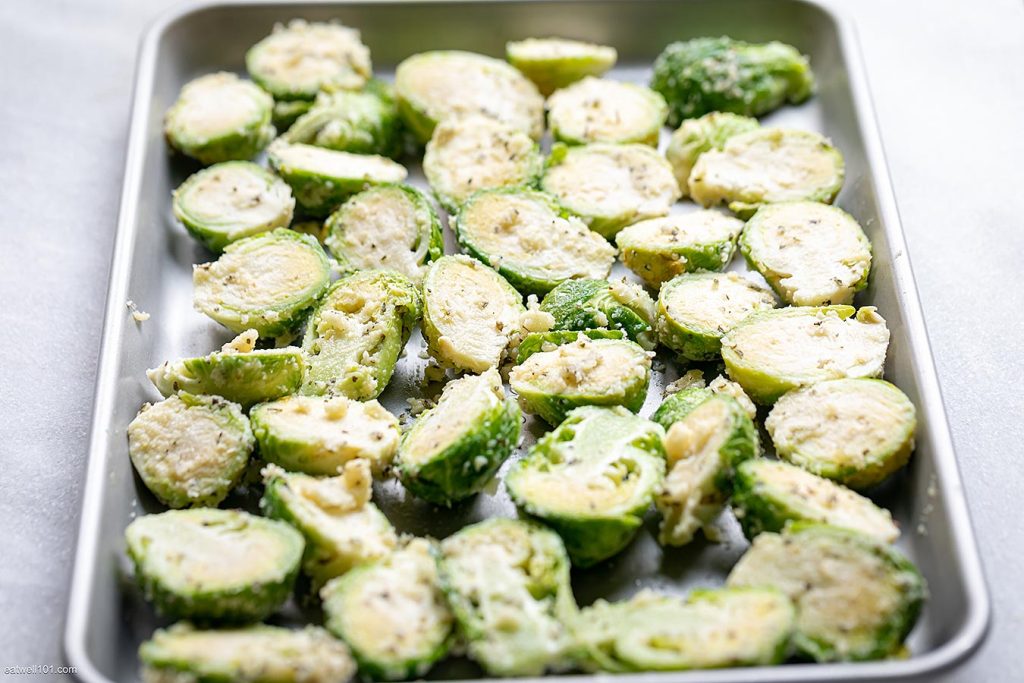
6. Transfer Brussels sprouts to your prepared baking dish and spread them evenly into one layer.

7. Bake for about 25 to 30 minutes Adjust the time depending on your oven, the Brussels sprouts should be golden brown.

8. Transfer the Parmesan roasted Brussels sprouts to a large serving bowl and sprinkle with fresh chopped parsley if you like. Enjoy! ❤️

Delicious Mississippi Mud Potatoes Recipe

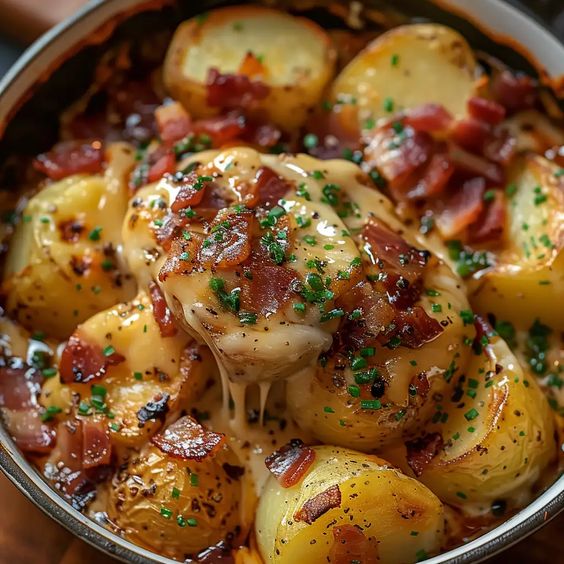
Mississippi Mud Potatoes are a creamy, cheesy potato casserole, perfect as a comfort food side dish. With a gooey mix of cheese and potatoes, topped with crispy bacon, this dish is a popular feature in Southern cuisine that pairs well with a variety of mains.

Ingredients

  • 6 cups potatoes, peeled and diced
  • 1 cup cheddar cheese, shredded
  • 3/4 cup mayonnaise
  • 1 cup bacon, cooked and crumbled
  • 3 teaspoons garlic, minced
  • 1/2 cup onion, chopped

Instructions

  1. Preheat the Oven:
    • Preheat your oven to 325°F (163°C). Prepare a 9×13 baking pan by greasing it lightly.
  2. Combine Ingredients:
    • In the prepared baking pan, mix together the diced potatoes, shredded cheddar cheese, cooked and crumbled bacon, minced garlic, and chopped onion.
  3. Add Mayonnaise:
    • Add the mayonnaise to the potato mixture and stir until everything is evenly coated.
  4. Bake:
    • Place the pan in your preheated oven and bake for about 1 1/2 hours, or until the potatoes are tender and the top is golden brown.
  5. Serve:
    • Serve hot straight from the oven. Enjoy the creamy, cheesy, bacon-filled delight that is Mississippi Mud Potatoes!

Notes:

  • For a lighter version, substitute sour cream with Greek yogurt and use low-fat cheese.
  • Add jalapeños or chili flakes to introduce a spicy kick to the dish.