Hi there! I'm Astrid Ogley, a passionate foodie and avid cook. With a love for all types of cuisine, from classic comfort food to exotic international dishes, I'm always looking to expand my culinary horizons. Through this blog, I share my tips and inspiration for cooking delicious meals and exploring new flavors.
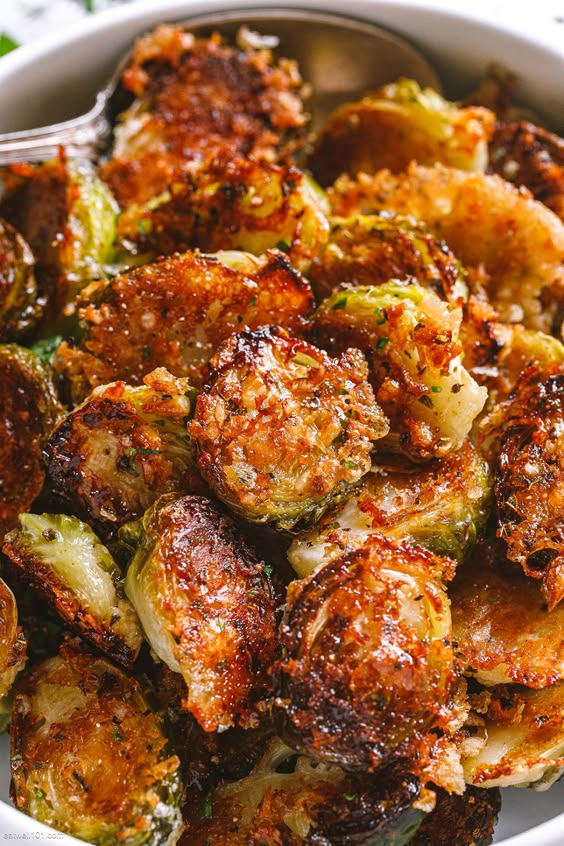
This yummy roasted Brussels recipe makes a flavourful and delicious side dish. The easy roasted Brussels sprouts side, perfect for upcoming Holidays table!
Ingredients list for the Parmesan Brussels sprouts
16 oz (450g) Brussels sprouts, rinsed
3 tablespoons olive oil (or melted butter)
1/2 teaspoon kosher salt and freshly cracked black pepper
1 teaspoon Italian seasoning
3 garlic cloves, minced
1/2 cup grated Parmesan cheese, or to taste
Directions:
How to make Roasted Brussels Sprouts:
1. Prep: Preheat oven to 400ºF (200ºC) with the rack in the middle.
2. Trim the bottom of the Brussels sprouts, and slice each Brussels sprout in half, top to bottom.
3. Grease a rimmed baking sheet a large baking sheet (you can line it with parchment paper if you like).
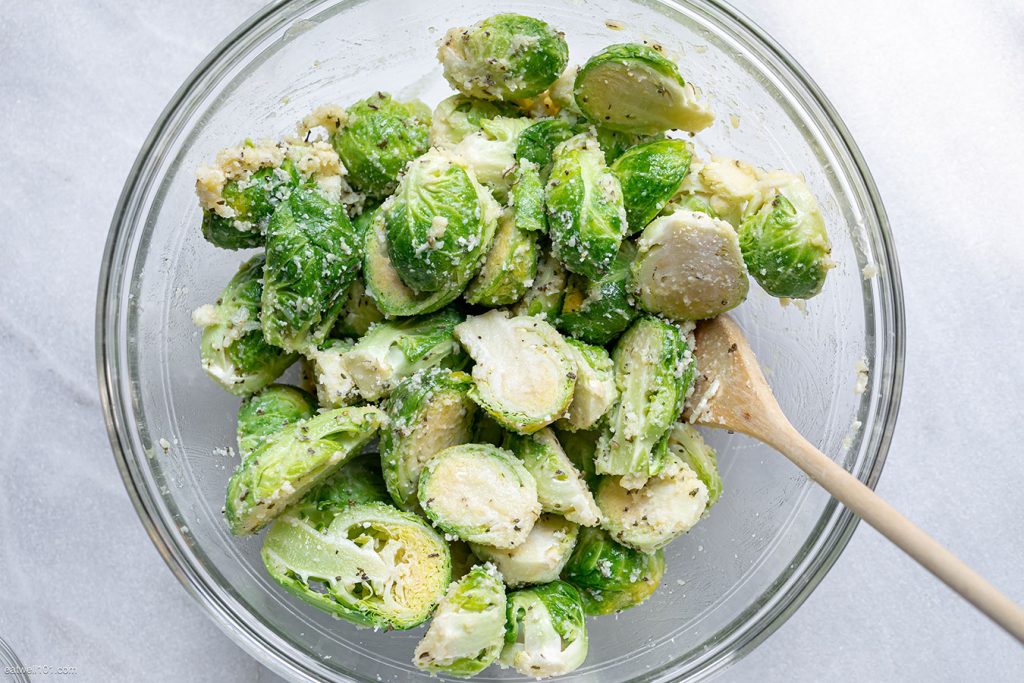
4. Pat the Brussels sprouts dry with paper towels and place them in a large bowl. Add olive oil, Italian seasoning, garlic, Parmesan, salt, and pepper.
5. Add olive oil, Italian seasoning, garlic, Parmesan, salt, and pepper. Toss gently to coat the Brussels sprouts evenly.
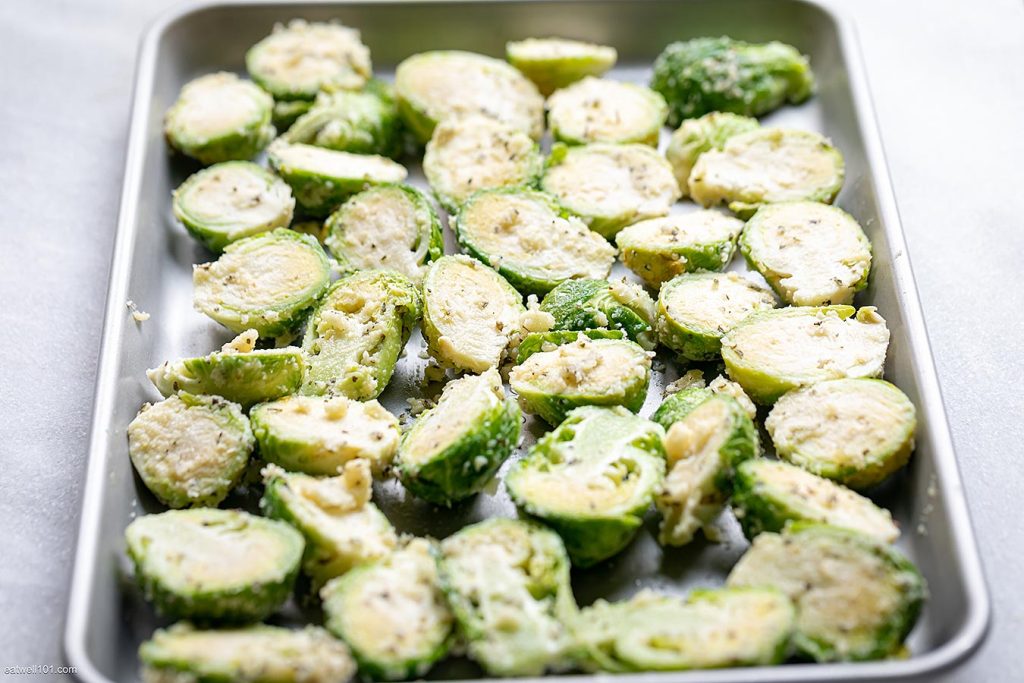
6. Transfer Brussels sprouts to your prepared baking dish and spread them evenly into one layer.
7. Bake for about 25 to 30 minutes Adjust the time depending on your oven, the Brussels sprouts should be golden brown.
8. Transfer the Parmesan roasted Brussels sprouts to a large serving bowl and sprinkle with fresh chopped parsley if you like. Enjoy! ❤️
Hi there! I’m Astrid Ogley, a passionate foodie and avid cook. With a love for all types of cuisine, from classic comfort food to exotic international dishes, I’m always looking to expand my culinary horizons. Through this blog, I share my tips and inspiration for cooking delicious meals and exploring new flavors.
Mississippi Mud Potatoes are a creamy, cheesy potato casserole, perfect as a comfort food side dish. With a gooey mix of cheese and potatoes, topped with crispy bacon, this dish is a popular feature in Southern cuisine that pairs well with a variety of mains.
Ingredients
6 cups potatoes, peeled and diced
1 cup cheddar cheese, shredded
3/4 cup mayonnaise
1 cup bacon, cooked and crumbled
3 teaspoons garlic, minced
1/2 cup onion, chopped
Instructions
Preheat the Oven:
Preheat your oven to 325°F (163°C). Prepare a 9×13 baking pan by greasing it lightly.
Combine Ingredients:
In the prepared baking pan, mix together the diced potatoes, shredded cheddar cheese, cooked and crumbled bacon, minced garlic, and chopped onion.
Add Mayonnaise:
Add the mayonnaise to the potato mixture and stir until everything is evenly coated.
Bake:
Place the pan in your preheated oven and bake for about 1 1/2 hours, or until the potatoes are tender and the top is golden brown.
Serve:
Serve hot straight from the oven. Enjoy the creamy, cheesy, bacon-filled delight that is Mississippi Mud Potatoes!
Notes:
For a lighter version, substitute sour cream with Greek yogurt and use low-fat cheese.
Add jalapeños or chili flakes to introduce a spicy kick to the dish.
Hi there! I’m Astrid Ogley, a passionate foodie and avid cook. With a love for all types of cuisine, from classic comfort food to exotic international dishes, I’m always looking to expand my culinary horizons. Through this blog, I share my tips and inspiration for cooking delicious meals and exploring new flavors.
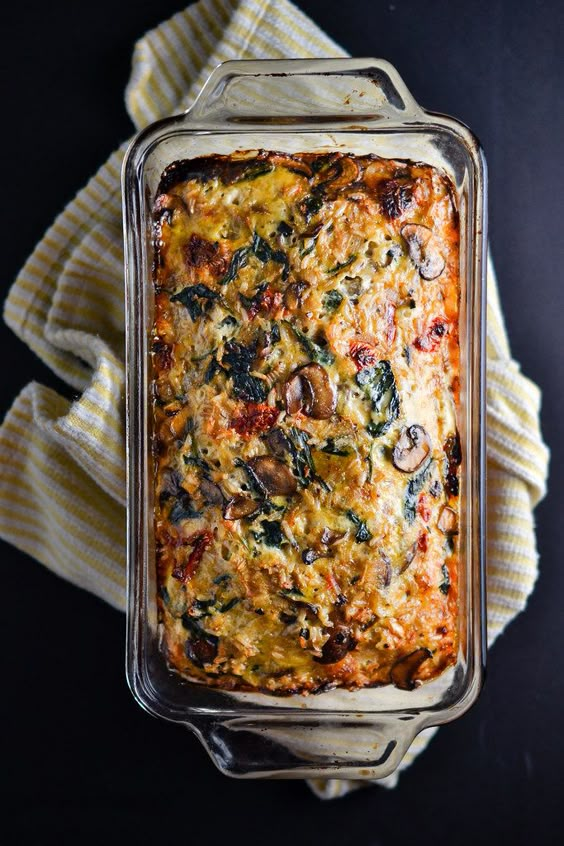
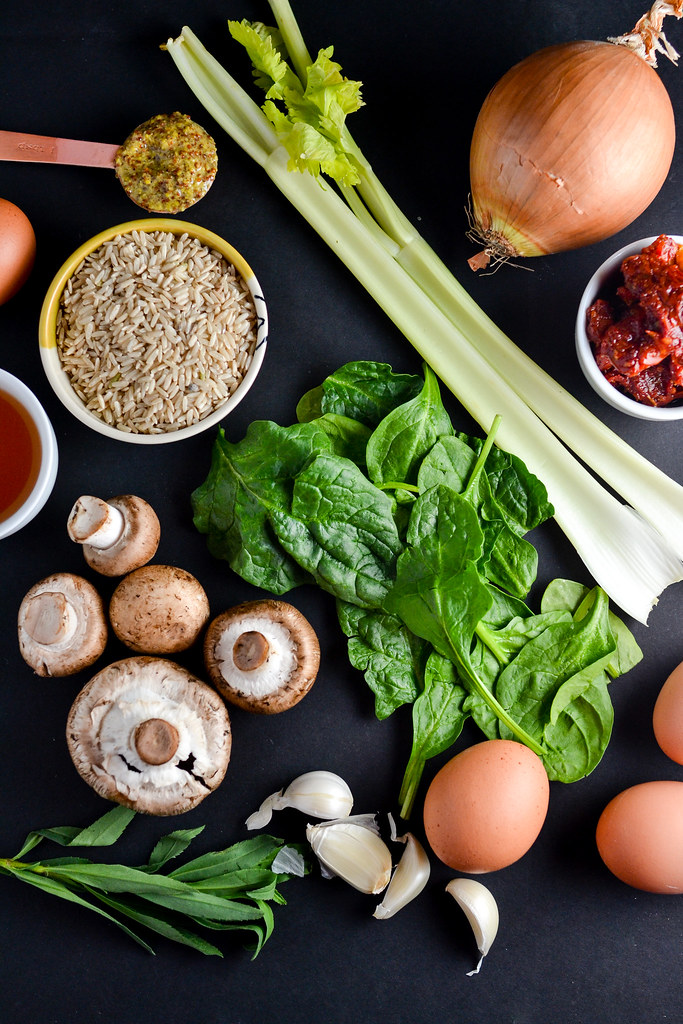
Vegetarian-loaf. That just doesn’t sound sexy. Nothing ending in “loaf” can possibly capture your attention in a way that makes you think, “yes, this—this is what I want to make to impress friends and win competitions.
Cook rice according to package instructions. Set aside.
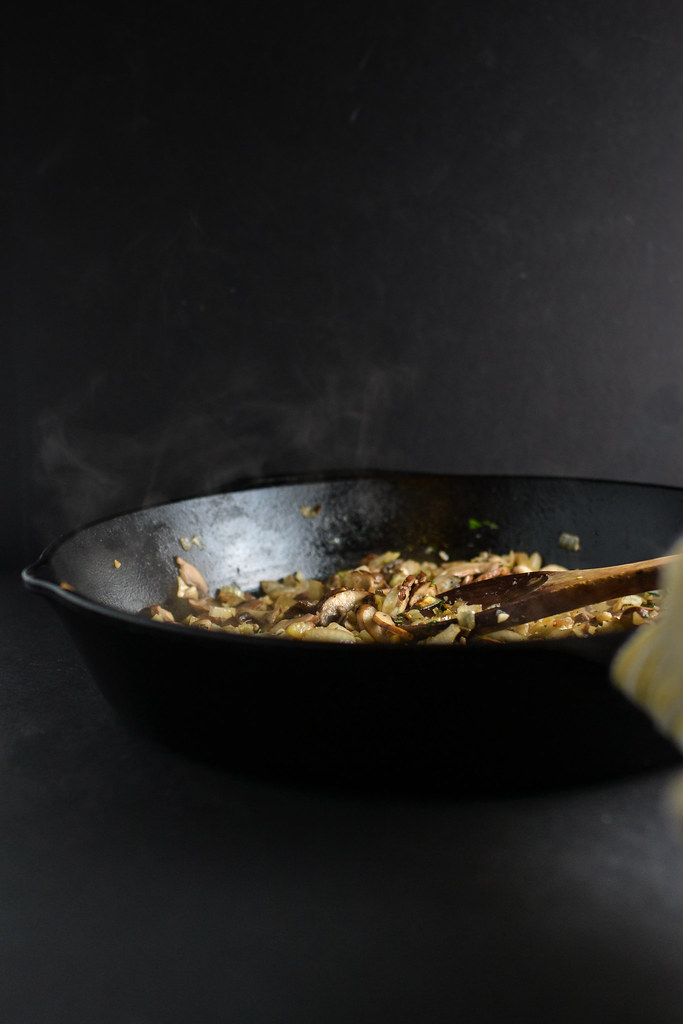
Meanwhile, in a large skillet, heat olive oil over medium high heat. Add onions and cook until translucent. Stir in garlic and celery and season with salt and pepper. Cook until vegetables are soft, about 5 minutes.
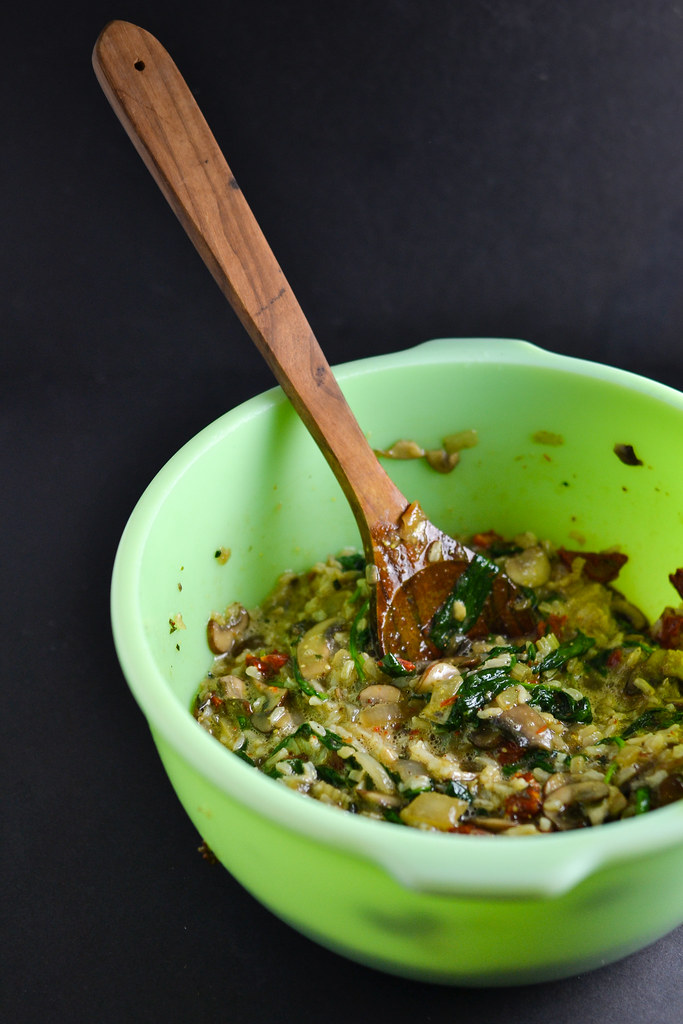
Add in mushrooms and tarragon and cook until mushrooms release their juices and the liquid evaporates, about 5 more minutes. Add in spinach and cook until wilted. Stir in sun dried tomatoes, then remove from heat and let cool slightly.
In a large bowl, whisk together eggs, mustard, and broth. Add in vegetable mixture and rice and stir to combine.
Generously grease a loaf pan with olive oil. Pour in vegetable mixture and smooth to flat with a spatula. Bake for 40-45 minutes, until edges are nicely browned. Let cool slightly, then run a knife along edges and flip onto platter.
Hi there! I’m Astrid Ogley, a passionate foodie and avid cook. With a love for all types of cuisine, from classic comfort food to exotic international dishes, I’m always looking to expand my culinary horizons. Through this blog, I share my tips and inspiration for cooking delicious meals and exploring new flavors.
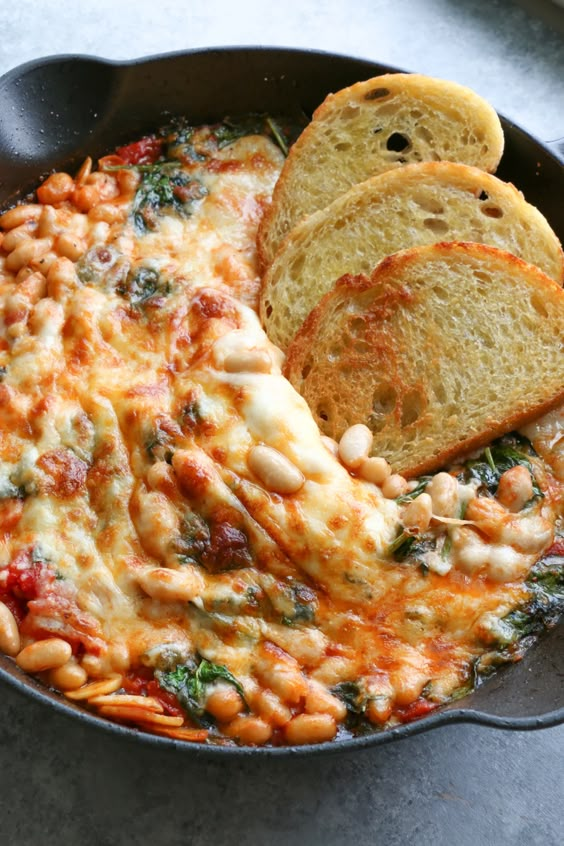
For those who crave the crispy, cheesy edges of lasagna where the tomato sauce caramelizes, this dish is made for you—even the center. A tube of tomato paste in this recipe brings the rich, concentrated flavor of sun-dried tomatoes.
By frying a generous amount, the sugars in the paste caramelize, infusing the olive oil with deep, savory flavors that cling to anything you mix in. In this case, it’s white beans, but you could easily swap in kale, pasta, or roasted veggies.
Top it with cheese, bake until it’s bubbling and golden to your liking, and serve with crusty bread and a bitter greens salad.
Ingredients
1/4 cup olive oil extra virgin
3 large garlic cloves thinly sliced
4 to 5 San Marzano peeled tomatoes
2 handfuls fresh spinach*
2 (15 oz) cans Cannellini white beans rinsed and drained
1 tablespoon water
1/4 to 1/2 teaspoon Italian seasoning
1/2 teaspoon crushed red pepper flakes
kosher salt and black pepper
2 cups shredded mozzarella
Instructions
Pre-heat the oven to 475 degrees. In a 10-inch ovenproof skillet, heat the olive oil over medium-high heat. Fry the garlic until lightly golden, about 1 minute. Add in the San Marzano peeled tomatoes (be careful of splattering) and mash them down with a potato masher or the back of a wooden spoon. Let cook for about a minute and then reduce the heat as needed to prevent the garlic from burning.
Add the spinach and the beans, water and then all the Italian seasoning, crushed red pepper flakes, and season with the salt and pepper. Stir to combine. Sprinkle the cheese evenly over the top, then bake until the cheese has melted and browned in spots; for about 8 to 10 minutes. For more browning, switch to the broiler setting and leave under the broiler for about 2 minutes. Serve with tortilla chips and enjoy immediately.
Notes
*If you add a lot of spinach, adding water isn’t necessary.
Hi there! I’m Astrid Ogley, a passionate foodie and avid cook. With a love for all types of cuisine, from classic comfort food to exotic international dishes, I’m always looking to expand my culinary horizons. Through this blog, I share my tips and inspiration for cooking delicious meals and exploring new flavors.
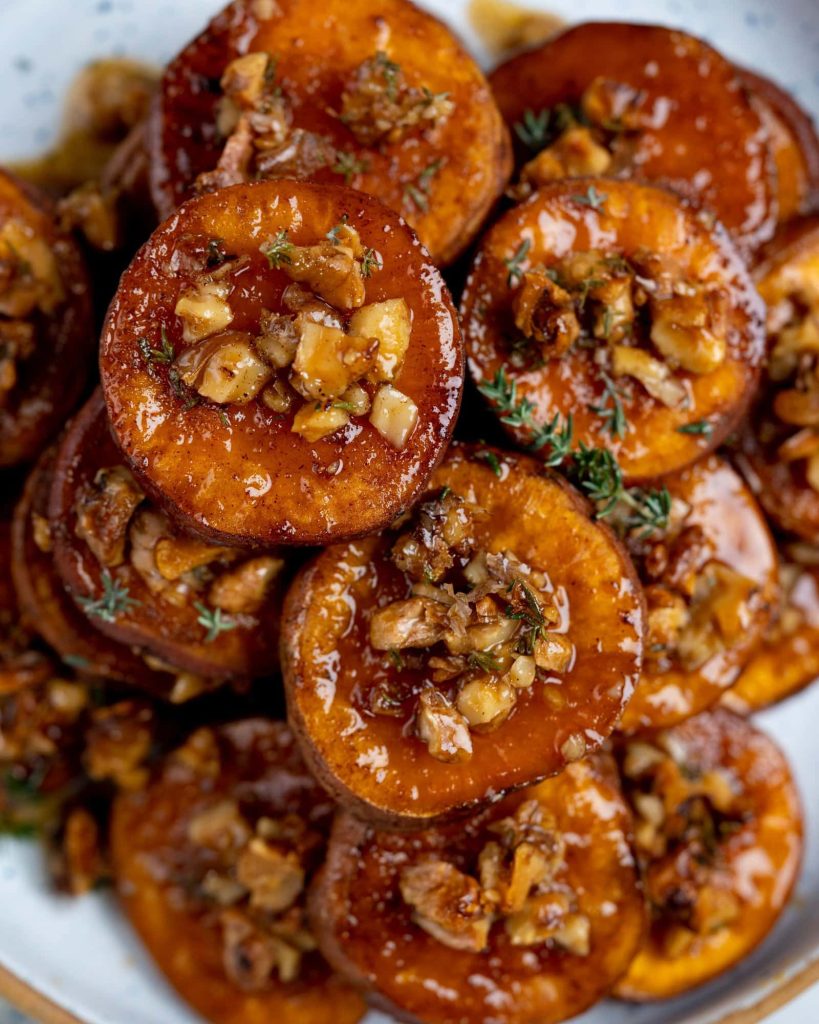
Roasted sweet potatoes – Sliced sweet potatoes tossed in cinnamon butter and topped with crunchy maple walnut topping then baked until tender. A delicious side to include in your Thanksgiving or Christmas spread.
Roasted sweet potatoes with maple syrup and walnuts make an excellent addition to your Thanksgiving dinner. Sweet potatoes are in season, and this recipe is a fantastic way to enjoy them.
This dish elevates simple roasted sweet potatoes with a glossy, rich maple glaze and a crunchy walnut topping. For an extra touch, try adding some crumbled feta cheese. Just writing about it makes my mouth water!
These glazed sweet potatoes with a crunchy topping are also perfect as a party appetizer. They strike the perfect balance between sweet and savory, and they’ve been a proven crowd-pleaser at my gatherings—disappearing off the plates in seconds.
The best part? This maple syrup-coated sweet potato recipe is incredibly easy to make. After a bit of chopping and mixing, just pop them in the oven for 30 minutes. The hardest part is waiting!
Ingredients
Sweet potatoes – buy sweet potatoes with that orange or red color which has more moisture. Select ones that do not have any cracks or bruises and have smooth skin.
Unsalted butter – when it comes to roasting, butter provides much more flavor and a rich taste to sweet potatoes than oil. It makes a difference but using oil is ok too.
Maple syrup – its sweetness and distinctive taste, a mix of caramel with other flavors, makes it an excellent choice for roasted veggies. Anything from golden to dark colors will do for this recipe.
Chopped walnuts – Added for the crunch on top of the roasted glazed potatoes.
Thyme – herbs like thyme give a herby flavor to the potatoes.
Cinnamon – gives a sweet and savory taste to the potatoes.
Salt & Pepper – Use 1/2 a teaspoon of each. I have used black pepper though you may use cayenne pepper for that extra hotness.
How to make roasted sweet potatoes
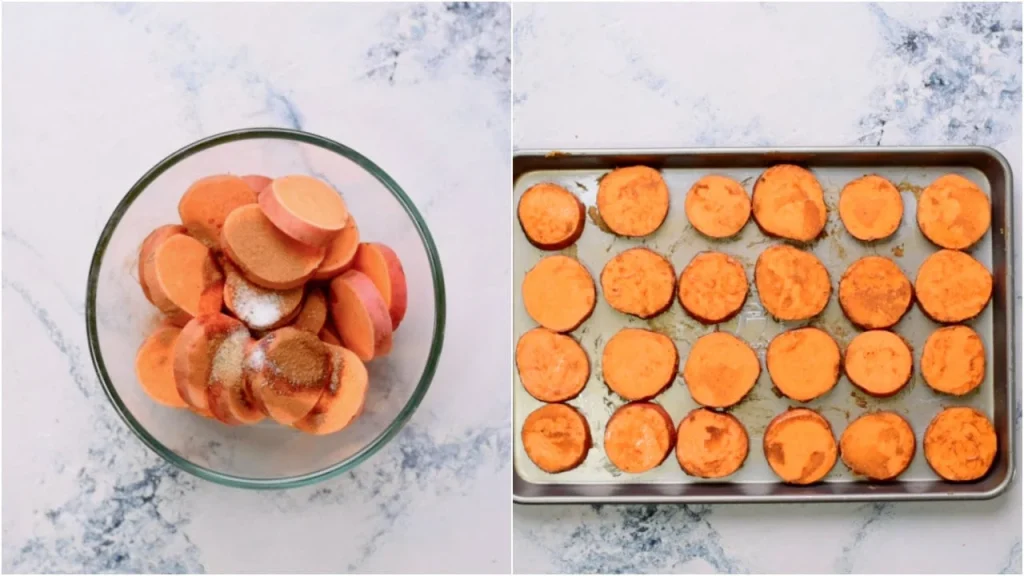
Start by preheating the oven and prepping the sweet potatoes. You are free to use the skin if you like. Slice them even to round about half an inch thick. You may cut those into sweet potato cubes or chunks but presenting them as slices would be the winning move.
In a bowl, mix salt, pepper, butter, and cinnamon with the sweet potatoes, making sure to toss and coat them evenly on all sides.
While you can use parchment paper or a baking sheet on the tray, I didn’t find it necessary. The butter on the potatoes prevents them from sticking when baked at the right temperature. Arrange the potatoes on the baking tray, ensuring they are spread out evenly. Avoid overcrowding, as this can cause them to steam and turn soft and mushy instead of roasting properly. For the same reason, don’t cover them with foil.
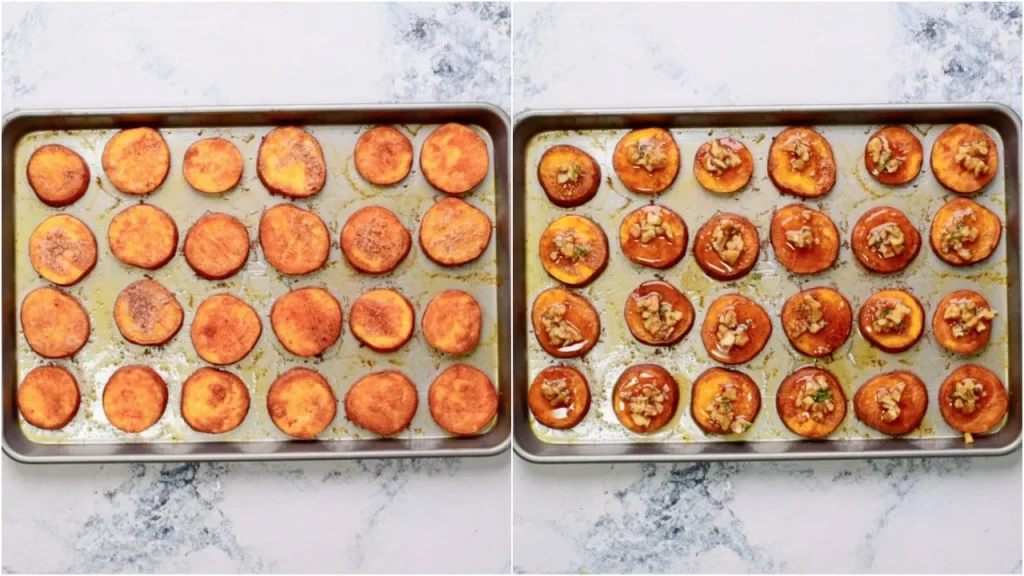
Place the tray in the oven and bake for 30 minutes, until the potatoes are cooked through and tender but still firm.
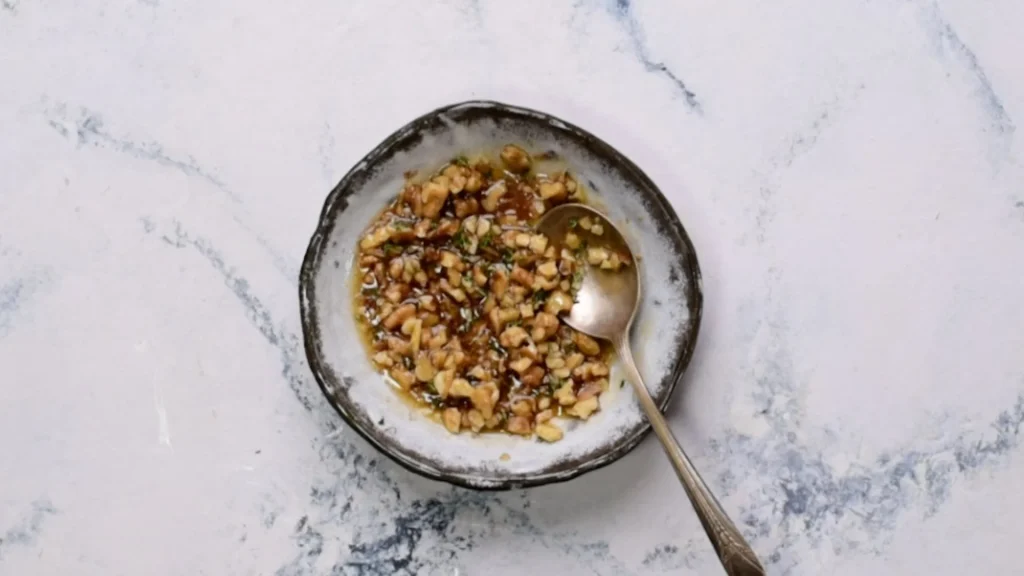
Spend this time making a mix of maple syrup, chopped walnuts, cinnamon, and thyme in a bowl. At the end of 30 minutes, remove the tray from the oven, and add a teaspoon of the syrup mix on top of each potato slice.
Return the baking tray to the oven for another 10 minutes. By now, these roasted sweet potato slices would be fork tender. Sprinkle some feta on top and serve.
Serve with
You can snack on these sweet delicious, oven-roasted sweet potatoes. It is carb heavy and is a great snack. Happy snacking!!!
Hi there! I’m Astrid Ogley, a passionate foodie and avid cook. With a love for all types of cuisine, from classic comfort food to exotic international dishes, I’m always looking to expand my culinary horizons. Through this blog, I share my tips and inspiration for cooking delicious meals and exploring new flavors.
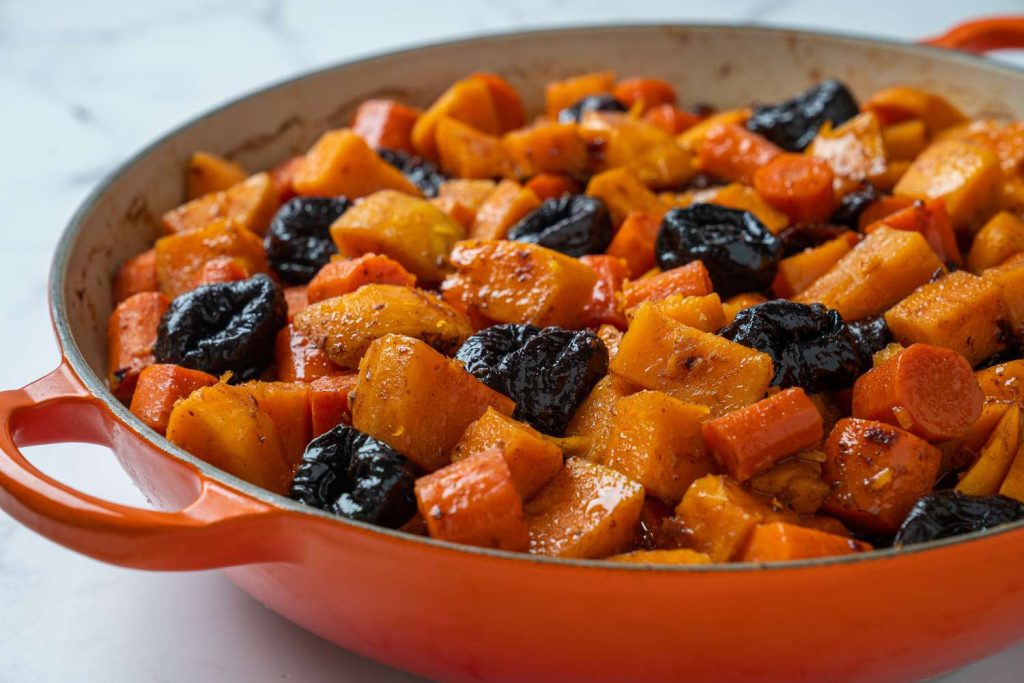
Here’s a delicious and traditional Tzimmes recipe, perfect for Rosh Hashanah or any holiday meal. It’s a sweet and savory dish made with root vegetables, dried fruits, and honey.
Ingredients:
1 pound carrots, peeled and sliced
2 large sweet potatoes, peeled and cubed
1 cup dried apricots, halved
½ cup pitted prunes
½ cup raisins
1 teaspoon ground cinnamon
½ teaspoon ground nutmeg
¼ teaspoon salt
¼ cup honey
2 tablespoons brown sugar (optional, for extra sweetness)
2 tablespoons orange juice
2 tablespoons olive oil or butter
1 cup water or vegetable broth
Optional: A few small chunks of brisket for a meat version
Instructions:
Preheat the Oven: Preheat your oven to 350°F (175°C).
Prepare Vegetables and Fruits: In a large mixing bowl, combine the carrots, sweet potatoes, apricots, prunes, and raisins.
Make the Sauce: In a small bowl, whisk together the honey, brown sugar (if using), cinnamon, nutmeg, orange juice, and olive oil (or butter). Add the water or broth and stir well.
Combine Ingredients: Pour the sauce over the vegetable and fruit mixture, stirring to coat everything evenly.
Bake the Tzimmes: Transfer everything to a large baking dish and cover with foil. Bake for about 1 hour, or until the vegetables are tender. Stir once or twice during baking to ensure even cooking.
Optional Meat Addition: If adding brisket, nestle the chunks of brisket into the tzimmes mixture before baking. Cook the same way until the brisket is tender.
Serve: Once done, remove from the oven, uncover, and let cool slightly before serving.
Tips:
Customize: You can add other root vegetables like parsnips or butternut squash.
Sweetness: Adjust the sweetness by adding more honey or brown sugar, depending on your preference.
Texture: If you prefer a richer texture, mash some of the vegetables slightly before serving.
This Tzimmes is comforting and sweet, perfect for symbolizing a prosperous new year during Rosh Hashanah!
Hi there! I’m Astrid Ogley, a passionate foodie and avid cook. With a love for all types of cuisine, from classic comfort food to exotic international dishes, I’m always looking to expand my culinary horizons. Through this blog, I share my tips and inspiration for cooking delicious meals and exploring new flavors.
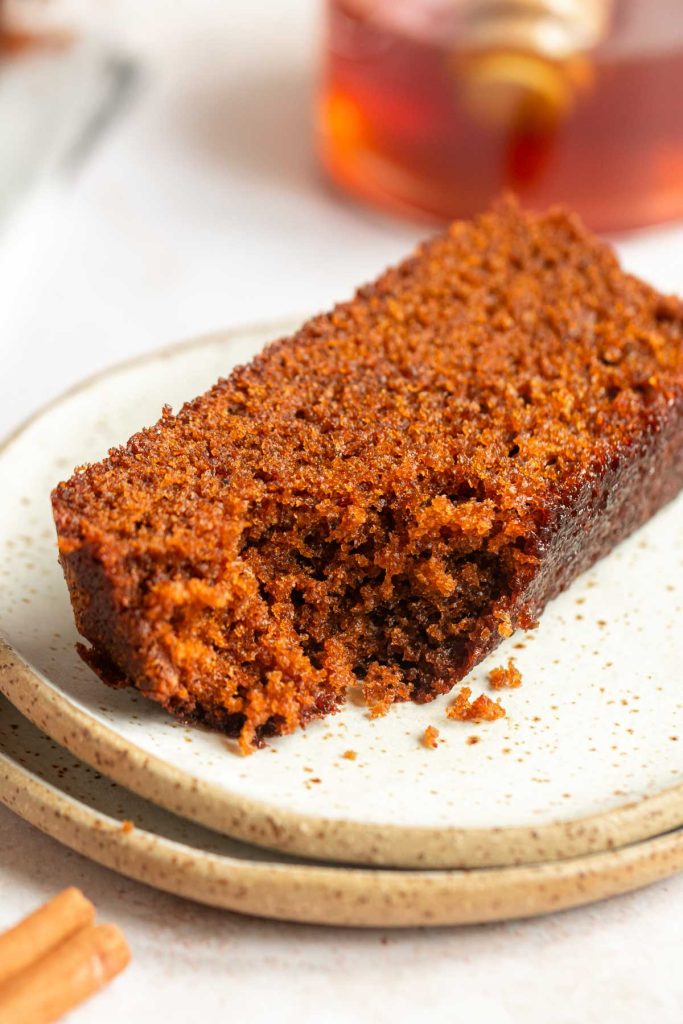
Honey cake is a cherished Rosh Hashanah tradition, symbolizing a sweet and prosperous new year. The honey in the cake represents abundance and blessings in Jewish culture.
Serving honey cake honors cultural heritage and unites families to celebrate new beginnings with sweetness. We make this cake every year and it disappears in minutes from how good it is.
Here’s a classic Honey Cake recipe for Rosh Hashanah that’s rich, moist, and perfect for celebrating the sweet new year:
Ingredients:
3 ½ cups all-purpose flour
1 tablespoon baking powder
1 teaspoon baking soda
1 teaspoon cinnamon
½ teaspoon ground cloves (optional)
½ teaspoon ground allspice (optional)
1 cup vegetable oil
1 cup honey
1 ½ cups sugar
½ cup brown sugar
3 large eggs
1 teaspoon vanilla extract
1 cup warm coffee or tea
½ cup orange juice
¼ cup whiskey (optional, but adds a rich flavor)
½ cup sliced almonds for topping (optional)
Instructions:
Preheat the Oven: Preheat your oven to 350°F (175°C). Grease and flour a 9×13-inch cake pan, or use two loaf pans.
Mix the Dry Ingredients: In a large bowl, whisk together the flour, baking powder, baking soda, cinnamon, cloves, and allspice.
Combine Wet Ingredients: In a separate large bowl, whisk together the oil, honey, sugars (both white and brown), eggs, and vanilla until smooth.
Add Coffee, Orange Juice, and Whiskey: Gradually add the coffee (or tea), orange juice, and whiskey (if using) to the wet ingredients and stir well.
Combine Wet and Dry Ingredients: Slowly add the dry ingredients to the wet mixture in batches, stirring until just combined. Be careful not to overmix.
Bake: Pour the batter into your prepared pan(s). If desired, sprinkle sliced almonds on top. Bake for 45–55 minutes, or until a toothpick inserted into the center comes out clean.
Cool: Let the cake cool in the pan before transferring it to a wire rack.
Tips:
Honey cake gets better with time. If possible, bake it a day or two before serving for the flavors to fully develop.
For an extra moist cake, lightly brush it with additional honey after it’s cooled.
This honey cake is aromatic with spices and rich in sweetness, making it a perfect treat for Rosh Hashanah!
Hi there! I’m Astrid Ogley, a passionate foodie and avid cook. With a love for all types of cuisine, from classic comfort food to exotic international dishes, I’m always looking to expand my culinary horizons. Through this blog, I share my tips and inspiration for cooking delicious meals and exploring new flavors.
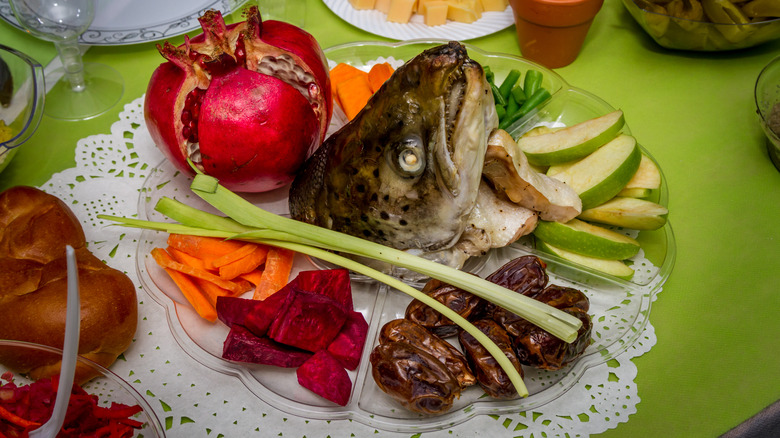
At Rosh Hashanah, it’s a customary practice to have a fish head on your table and to take from it as a reminder that you should act like the head in life and not the feet.
Prepare like gefilte fish.
1 fish head
2 carrots
1 medium onion
1 tsp salt
1/2 tsp pepper
7 Tbsp sugar
Cut two carrots and peel one medium onion. Add to 6 cups of water with 1 tsp salt, 1/2 tsp pepper, 7 tablespoons sugar (if you like a sweet fish…change amount as suited). Bring to boil. Add fish head. Lower heat to simmer and cover. Simmer for 1 hr – 1 hr and a 1/2. Head will be done when flakes with a fork.
This should keep in your fridge throughout Yom Tov. Wrap well in a plastic container to prevent entire fridge from smelling. It is taken out for each meal. Remember to remove it before serving meat.
Hi there! I’m Astrid Ogley, a passionate foodie and avid cook. With a love for all types of cuisine, from classic comfort food to exotic international dishes, I’m always looking to expand my culinary horizons. Through this blog, I share my tips and inspiration for cooking delicious meals and exploring new flavors.
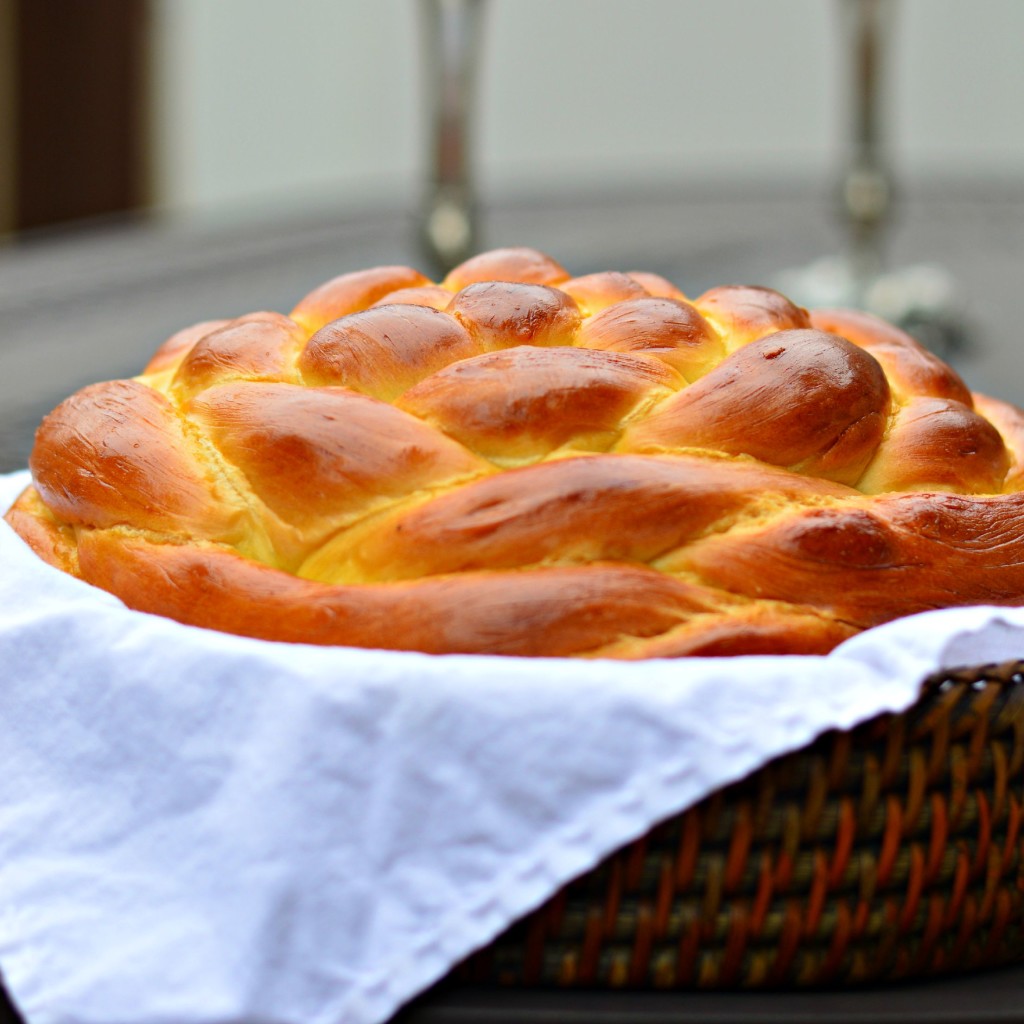
The Perfect Rosh Hashanah Round Challah Recipe for Your Holiday Table
Rosh Hashanah, the Jewish New Year, is synonymous with sweet traditions, and none is more iconic than the round challah. This Rosh Hashanah round challah recipe will guide you through creating this symbolic bread, perfect for your holiday celebrations.
Why Make a Round Challah for Rosh Hashanah?
The round shape of this special Rosh Hashanah challah represents:
The cyclical nature of the year
Continuity of creation
Hope for a “well-rounded” year ahead
Unlike the braided challah served on Shabbat, this Rosh Hashanah round challah recipe produces a circular loaf, often studded with raisins for added sweetness – a key theme of the holiday.
Rosh Hashanah Round Challah Recipe
Ingredients:
4 cups all-purpose flour
1/4 cup sugar
1 packet active dry yeast (2 1/4 teaspoons)
1 1/2 teaspoons salt
2 large eggs + 1 for egg wash
1/4 cup vegetable oil
1/2 cup warm water
Optional: 1/2 cup raisins, poppy seeds, or sesame seeds for topping
Instructions:
Mix dry ingredients: Combine flour, sugar, yeast, and salt in a large bowl.
Prepare wet ingredients: In a separate bowl, whisk 2 eggs, oil, and warm water.
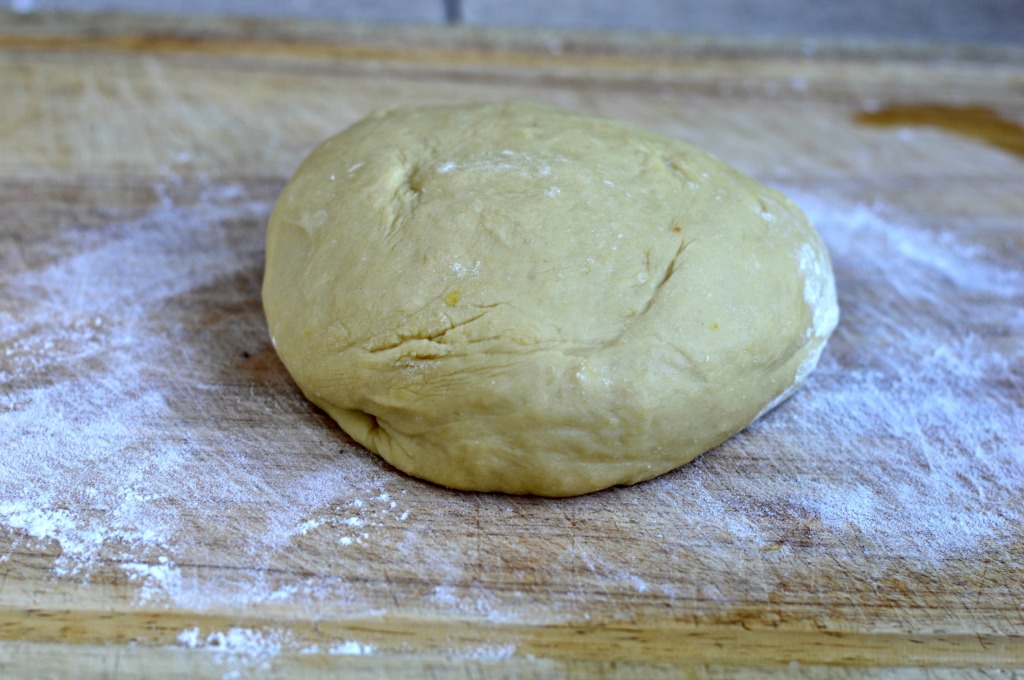
Form dough: Gradually add wet to dry ingredients, mixing until a dough forms. Incorporate raisins if using.
Knead: On a floured surface, knead dough for about 10 minutes until smooth and elastic.
First rise: Place dough in an oiled bowl, cover, and let rise in a warm place for about 1 hour or until doubled.
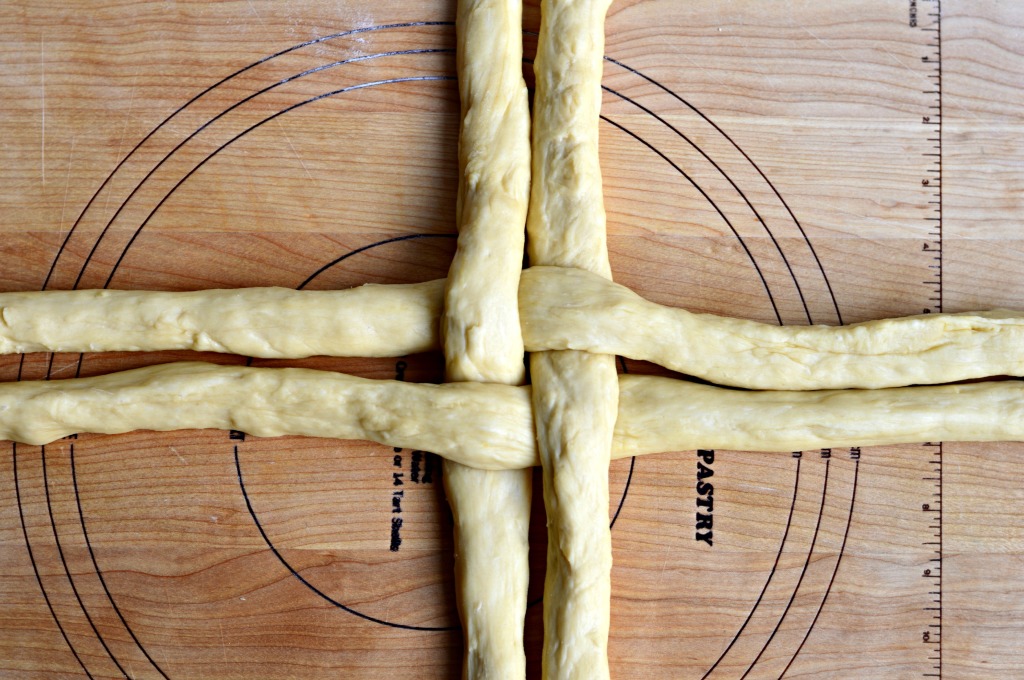
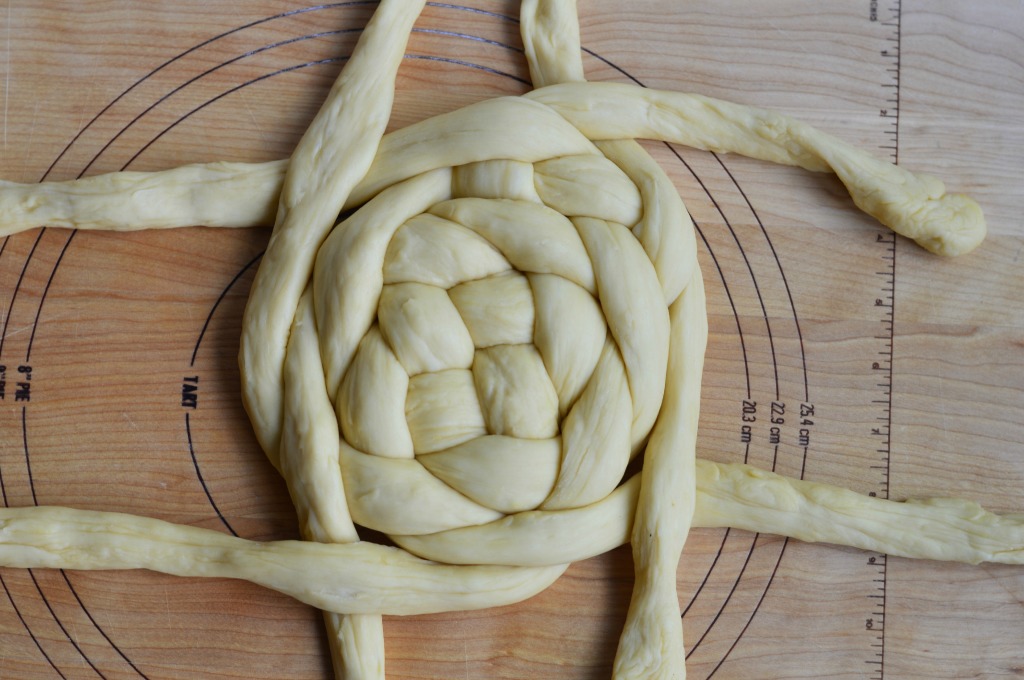
Shape: Punch down dough, divide into 3 parts, and roll each into an 18-inch rope.
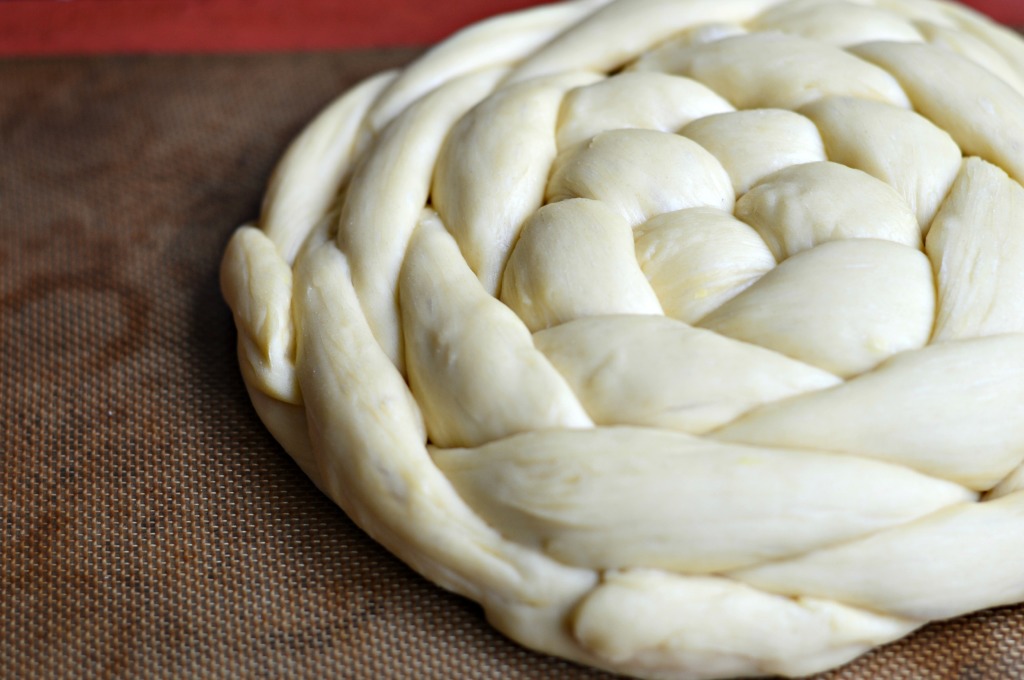
Create round shape: Braid the ropes, then form into a circle, pinching ends to seal.
Second rise: Place on a baking sheet, cover, and let rise for 30 minutes.
Preheat: Set oven to 350°F (175°C).
Prepare for baking: Brush challah with beaten egg and add optional seed topping.
Bake: 30-35 minutes or until golden brown and hollow-sounding when tapped.
Cool: Let the Rosh Hashanah round challah cool on a wire rack before serving.
Why do we eat a round challah on Rosh Hashanah?
The reason that we do the round challah, versus the braids, for Rosh Hashana, is because the year is round, it represents that idea. This looks like a crown, for crowning God as king on Rosh Hashana.
Serving Your Rosh Hashanah Round Challah
Traditionally, this Rosh Hashanah round challah recipe is served with honey, symbolizing wishes for a sweet new year. Some families also add apple slices for dipping in honey, creating a complete Rosh Hashanah sweet treat.
By following this Rosh Hashanah round challah recipe, you’re not just baking bread – you’re participating in a meaningful tradition that connects you to Jewish heritage and the hopeful spirit of the New Year.
Shana Tova! May your year be as sweet as this homemade Rosh Hashanah round challah.
Hi there! I’m Astrid Ogley, a passionate foodie and avid cook. With a love for all types of cuisine, from classic comfort food to exotic international dishes, I’m always looking to expand my culinary horizons. Through this blog, I share my tips and inspiration for cooking delicious meals and exploring new flavors.
Get ready to delve into the world of bizarre and intriguing foods enjoyed in different countries around the globe. From fermented shark meat to raw blood clams, these culinary delights are not for the faint of heart. Discover the top 10 weirdest foods that are considered delicacies in various cultures.
Armenian Soup – Kush: Made from cow feet and stomach, this traditional soup is a hangover cure and a culinary ritual in Armenia.
Hákarl (Fermented Shark) – Iceland: Toxic shark meat turned edible after a months-long fermentation process.
Stink Bugs – Africa and Taiwan: Spicy insects that are a popular snack minus the stench glands.
Blood Clams – Indian Ocean: Raw clams rich in hemoglobin but risky due to potential viruses and bacteria.
White Ant Egg Soup – Vietnam/Cambodia: A unique concoction of ant eggs, partially developed embryos, and baby ants.
Tuna Eyeballs – Japan: Delicacy made from tuna eyes that need to be cooked before consumption to avoid bacteria exposure.
Uni (Sea Urchin Gonads) – Japan: A versatile ingredient that adds a unique flavor to various dishes.
Odori Don – Japan: Live octopus or squid served to you with soy sauce, causing a wriggling sensation due to its neurons being activated by sodium.
Balut – Philippines: Fertilized duck eggs containing embryos believed to be a libido-enhancing delicacy but not dangerous to eat.
Fruit Bat Soup – Guam: An unconventional dish prepared by boiling a wild fruit bat alive and serving it whole in coconut milk and vegetables.
Exploring the world’s culinary diversity reveals both the creativity and extreme nature of the human palate. While some may find these dishes outrageous, for others, they represent cherished traditions and unique culinary experiences. The global love for food transcends mere sustenance, offering a glimpse into the cultural tapestry that makes our world so wonderfully diverse.
Hi there! I’m Astrid Ogley, a passionate foodie and avid cook. With a love for all types of cuisine, from classic comfort food to exotic international dishes, I’m always looking to expand my culinary horizons. Through this blog, I share my tips and inspiration for cooking delicious meals and exploring new flavors.